• This is Slide 1 Title

    This is slide 1 description. Go to Edit HTML and replace these sentences with your own words. This is a Blogger template by Lasantha - PremiumBloggerTemplates.com...

  • This is Slide 2 Title

    This is slide 2 description. Go to Edit HTML and replace these sentences with your own words. This is a Blogger template by Lasantha - PremiumBloggerTemplates.com...

  • This is Slide 3 Title

    This is slide 3 description. Go to Edit HTML and replace these sentences with your own words. This is a Blogger template by Lasantha - PremiumBloggerTemplates.com...

Monday, 21 March 2016

Get 4.5GB Data Plan On Airtel

Airtel has just introduced a new data offer which you'll get 4.5GB data for just 2k for a month,and i think this plan is very cheap and very nice with a good network with fast internet connection,and I heard that one plan was on airtel before it was blocked where user get 4gb for just 1,500 and most users enjoyed it an now there's another best offer again which I'd know users can enjoy but unfortunately the plan is not eligible for all users but a lot of airtel sim cards qualify for the plan and also for you not to waste credit you'll need to know either your Sim card is eligible and there's a way to do that.

How to Know Either You're Eligible

  • You can actually test either you're eligible before recharging the credit so before you recharge dial *440*161#
  • After dialing the number then wait to recieve a message,if the message says: "Dear customer, you do not have sufficient balance for this plan.”Then that means you're eligible for the plan
  • Then you can now proceed in recharging the amount
  • But if you dialed the code and got a response that says:“Dear customer, you do not qualify for this plan”,then don't load the money on it because it will not work for that line, but you can try any other airtel sims,at least one would work.
Now that we've discovered how to be qualified and we're qualified now follow the procedures on getting the offer
  • Recharge the N2000 and dial *440*161# or *437*1#
  • You'll be credited with 4.5GB data bundle for 30 days
  • After being credited,dial *141*712*0# or *123*10# to check your data balance.
That's all,you can start enjoying this offer as from now and don't.

Don't read and get out but remember to comment and share to others,Good Luck.

Wednesday, 16 March 2016

How To Fix Androids Not Connecting Through Psiphon Or Simpleserver

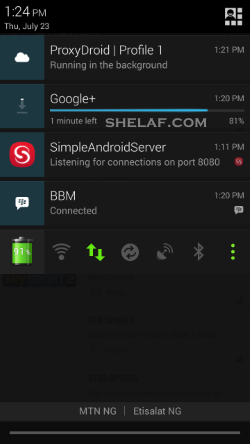
It is confirmed that many android phone apps do not connect whenever you use SimpleServer or Psiphon,only a few apps work when trying to connect to the internet,apps like Whatsapp,BBM,2go,Facebook,Badoo,Instagram,Google Play Store and others,they refuse to connect through Psiphon or SimpleServer but this post is here to help those users facing this problem on their phones.
Here is an image of the app needed and connecting through Psiphon to BBM from Shelaf.com


One is AutoProxy and the other one is proxydroid,one of these two's are needed for the tweak,but before carrying on make sure you have an active subscription to browse through simpleserver or psiphon,or the 150MBcheat from MTN and the last point make sure your phone is rooted before perform this step

SimpleServer or Psiphon Configuration Settings for AutoProxy

  • First of all, download AutoProxy.apk here.
  • Install and launch the AutoProxy you downloaded and tap on the Plus Sign ( ) at the top right corner of the App interface, it will reveal the default settings for the Proxy Host, Proxy Port and Host type.
  • Tap on the Proxy Host and enter this IP:127.0.0.1 then press OK.
  • Tap on the Proxy Port and enter PORT:8080 then press OK.
  • Now tap the Proxy Type and select HTTP.
  • Go back to the AutoProxy homepage and you will see the HTTP icon as the only icon located at the top left corner of the white page homepage.
  • To connect the AutoProxy, you will need to connect your SimpleServer or Psiphon first. So start up your SimpleServer or Psiphon and then come back and connect your AutoProxy app from the homepage. Your entire Android app will now be powered to access the internet via SimpleServer or Psiphon!
SimpleServer or Psiphon Configuration Settings for ProxyDroid.

  • First of all, download ProxyDroid.apk here.
  • Launch your ProxyDroid after you must have downloaded it to your phone.
  • Then enter these IP in the Proxy Host 127.0.0.1 and Port: 8080
  • Now, look up and Switch ON the ProxyDroid, but remember to connect your SimpleServer or Psiphon first, then come back to ProxyDroid and tap on Switch OFF to switch it ON and you can now minimize it.
  • Launch any application on your Android device and it should connect perfectly.
  • You are also free to access Google Play Store with any of these applications via SimpleServer or Psiphon.

    Note:I said you can choose one out of the both apps and don't use the both together at once.

    Do not forget to reply or share this post with other users if found this post helpful.

    Sunday, 6 March 2016

    How Get 150MB On MTN Through Psiphon

    This post isn't new to other guys out there and some may haven't heard about this MTN Musicplus service which MTN gives you 150MB to stream musics from their store,but there's a way to discrypt it and make it easy to use for browsing and downloading but before connecting,you must get the 150MB first.
    Goto your message box and send MUSIC TO 5900 then dial *559*2# to check data balance.
    How to Turn the 150MB Into Unlimited Data Plan
    When the 150MB is exhausted the browser stops,so this method will explain how to keep enjoying it over and over.
    1. After You have exhausted your 150MB
    2. Make sure you have no credit to avoid deduction.
    3. Text D to 5900, And another 150MB will be given to you.
    4. After getting your reply, You can Check your data balance by dialing *559*2# Now connect and resume your surfing.
    5. After exhausting the 150MB given to you again, SendCancel7D to 5900
    6. Then wait for the reply and send D again to 5900.
    7. Check your balance again when they reply you.
    That's how you can keep on renewing the 150MB over and over.
    After completing the steps above, You can then setup your Psiphon or SimpleServer with the procedure below.

    Psiphon Configuration for android devices

    • First,Download Psiphon handler 100 version from here. and Install it on your Android Device
    • Create New APN settings On Your Phone As Follows:
    • Open your phone settings>>> more>>>Mobile network >>>access point names >>>Select MTN, Then create new APN and configure as shown below:
    • APN Type: default
    • APN:web.gprs.mtnnigeria.net
    • Proxy:10.199.212.2
    • Port: 8080
    • Save And Activate it as your default settings
      Then Launch Psiphon Handler, in the handler menu:
    • Proxy type: Real Host
    • Proxy server: musicplus.mtnonline.c om
    • Real Proxy type: inject
    • Real Proxy server: (leave it blank)
    • Select save and click on“tunnel whole device”. Click on the option tab
    • Region: Japan
    • Select more option, And check“Connect through an HTTP”then select“Use the following settings:”then configure as:
    • Host address: 10.199.212.2
    • Port: 8080
    Save and Connect it,and for those who are familiar with Simpleserver,a post on how to use it through simpleserver is on the way.

    Always remember to use the comment box below when visiting here.

    Thursday, 3 March 2016

    MTN Unlimited Browsing Through Magic Sim


    I’ve just heard about this new MTN Magic Sim Tweak which was enjoyed by some MTN Users last year and here’s another tested first tweak discovered this year and I hope you know about magic sim which you’ll switch of your Sim Card for a day,few days or hours but after Sim is hacked successfully then it’s time to browse and stream unlimitedly for internet surfing till it expires so don’t waste time after following these steps.

    Guidelines in Activation of MTN Magic Sim

  • Recharge N250 Credit or transfer it to the phone.
  • After N250 has been on the MTN account balance now dial *131*1 *4*1# for 2 hours data plan.
  • When the code is dialed then the recharged N250 will be deducted,then all you’ll do is to browse for just 5-10 minutes( Must not be over 10minutes).
  • Now remove the sim card and keep it off from phone for 24 hours
  • After 24 hours then put it ON then start enjoying the tweak you may recieve a message saying your plan has expired but never mind keep enjoying the magic sim.
  • Note:This tweak is very risky in some aspects like after the 2 hour plan expire it won’t show up but if you’re smart just try it.
    Never forget to use the comment box below and if any problem occurs just reply here to get solution.